-
• Origin and first comic book appearance of John Carter (created by Edgar Rice Burroughs). \n \n• 'The Air-Pirates of Mars' – Dejah Thoris has been kidnapped from Helium. John Carter sets out to find where she has been taken. During his battle with a warhoon, he remembers his past and how he ended up in Barsoom and how he met his future bride--Dejah Thoris.: Condition: 6.5 105 / 193 -
• Origin and first comic book appearance of John Carter (created by Edgar Rice Burroughs). \n \n• 'The Air-Pirates of Mars' – Dejah Thoris has been kidnapped from Helium. John Carter sets out to find where she has been taken. During his battle with a warhoon, he remembers his past and how he ended up in Barsoom and how he met his future bride--Dejah Thoris.: Condition: 6.5 106 / 193 -
• 'The Tri-Man Lives!' – (20-page story, reprinted from Daredevil # 22, Nov. 1966) – The Masked Marauder and Gladiator create the Tri-Android and power him up with the combined skills of three master criminals. The dastardly duo send their android after DD in a bid to win leadership of the Maggia.: Condition: 8.0 110 / 193 -
• 'The Tri-Man Lives!' – (20-page story, reprinted from Daredevil # 22, Nov. 1966) – The Masked Marauder and Gladiator create the Tri-Android and power him up with the combined skills of three master criminals. The dastardly duo send their android after DD in a bid to win leadership of the Maggia.: Condition: 8.0 111 / 193 -
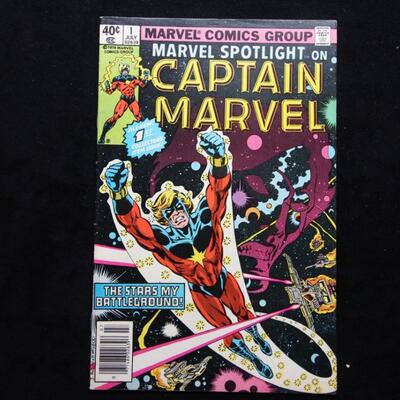
Captain Marvel \n'The Saturn Storm' : Condition: 8.5 112 / 193 sold -
Captain Marvel \n'The Saturn Storm' : Condition: 8.5 113 / 193 sold -
'The Deadly Gambit of Conquer-Lord' – (17-page story, continued from previous issue) – Moon Knight tries to prevent the Conquer-Lord from assassinating the mayor, while he succeeds in preventing the mayors death, the mayor is still wounded from the shot, and Conquer-Lord and his minions manage to escape with Marlene as their hostage. \n \nMoon Knight then tries to track down the Conquer-Lord by going after his associate Merkins, and manages to track down Conquer-Lord's base. There he fights through the Conquer-Lord's men, eventually getting to the central control room. There he finds Marlene being suspended over a pit with alligators. \nMoon Knight is then dumped into a chess board themed battle arena where he is forced to fight the Conquer-Lord and his gigantic trick chess pieces. Although the Conquer-Lord tries to escape, Moon Knight manages to stop him and save Marlene, leaving the unmasked Conquer-Lord for the authorities, with his calling card left identifying Moon Knights involvement.Comic Database (comics.org) : Condition: 5.0 114 / 193 -
'The Deadly Gambit of Conquer-Lord' – (17-page story, continued from previous issue) – Moon Knight tries to prevent the Conquer-Lord from assassinating the mayor, while he succeeds in preventing the mayors death, the mayor is still wounded from the shot, and Conquer-Lord and his minions manage to escape with Marlene as their hostage. \n \nMoon Knight then tries to track down the Conquer-Lord by going after his associate Merkins, and manages to track down Conquer-Lord's base. There he fights through the Conquer-Lord's men, eventually getting to the central control room. There he finds Marlene being suspended over a pit with alligators. \nMoon Knight is then dumped into a chess board themed battle arena where he is forced to fight the Conquer-Lord and his gigantic trick chess pieces. Although the Conquer-Lord tries to escape, Moon Knight manages to stop him and save Marlene, leaving the unmasked Conquer-Lord for the authorities, with his calling card left identifying Moon Knights involvement.Comic Database (comics.org) : Condition: 5.0 115 / 193 -
1st appearance of Misty Knight (Mercedes Knight) (Unnamed) \n \n \n'Have Yourself a Sandman Little Christmas!' – (21-page story) – Spidey and the Torch tangle with the Sandman on Christmas Eve but show a little mercy when they find he is trying to deliver a gift to his ailing mother.: Condition: 5.0 VG/FN 116 / 193 -
1st appearance of Lord Chaos
1st appearance of Master Order
Death of Thanos
'Death Watch!' – (34-page story, continued from Avengers Annual #7) – The Thing and Spidey travel to Thanos' huge space ship which he plans on using in conjunction with the Soul Gem to make the sun go nova, thus ending all life in the solar system. Thing is captured and placed in stasis along with the Avengers but Spidey pulls himself together and breaks them all free. As the heroes battle the mad Titan, Spidey is tipped off by Chaos and Order and frees Adam Warlock from the Soul Gem for a final showdown with Thanos. : Condition: 9.0 VF/NM117 / 193 -
1st appearance of Lord Chaos
1st appearance of Master Order
Death of Thanos
'Death Watch!' – (34-page story, continued from Avengers Annual #7) – The Thing and Spidey travel to Thanos' huge space ship which he plans on using in conjunction with the Soul Gem to make the sun go nova, thus ending all life in the solar system. Thing is captured and placed in stasis along with the Avengers but Spidey pulls himself together and breaks them all free. As the heroes battle the mad Titan, Spidey is tipped off by Chaos and Order and frees Adam Warlock from the Soul Gem for a final showdown with Thanos. : Condition: 9.0 VF/NM118 / 193 -
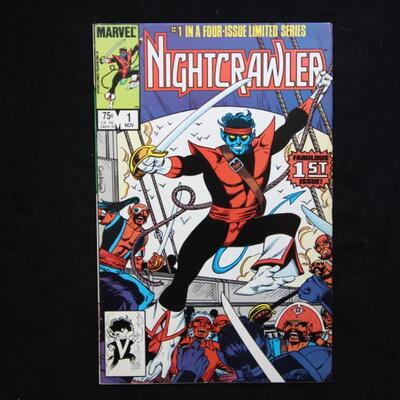
How Much Is that Boggie in the Window?' : Condition: 8.0 VF 123 / 193 sold -
How Much Is that Boggie in the Window?' : Condition: 8.0 VF 124 / 193 sold -
Early new X-Men (Team) appearance \n \n• 'Pharaohs on Broadway!' – (story continues from last issue) – With the Living Monolith's powers restored, the powerful mutant easily beats Power Man and Iron Fist before breaking free of his apartment and begins rampaging through the city. In trying to stop the Monolith, the Heroes for Hire run into their associates Colleen Wing and Mercedes Knight. They are with Cyclops, Nightcrawler and Storm of the X-Men who agree to help keep the Living Monolith occupied while Power Man and Iron Fist try and figure out how the Monolith managed to regain his powers. \nThe two heroes learn that the Monolith is getting his power from the Cheops Crystal, which when using victims placed in three different sarcophagi placed in different locations by members of the Halwani Embassy. When Power Man and Iron Fist free each of these men, the Monolith's powers weaken until he's reduced to his former self. With the Monolith powerless, Iron Fist destroys the Cheops Crystal, rending Ahmet back to his normal self.: Condition: 6.5 125 / 193 -
Early new X-Men (Team) appearance \n \n• 'Pharaohs on Broadway!' – (story continues from last issue) – With the Living Monolith's powers restored, the powerful mutant easily beats Power Man and Iron Fist before breaking free of his apartment and begins rampaging through the city. In trying to stop the Monolith, the Heroes for Hire run into their associates Colleen Wing and Mercedes Knight. They are with Cyclops, Nightcrawler and Storm of the X-Men who agree to help keep the Living Monolith occupied while Power Man and Iron Fist try and figure out how the Monolith managed to regain his powers. \nThe two heroes learn that the Monolith is getting his power from the Cheops Crystal, which when using victims placed in three different sarcophagi placed in different locations by members of the Halwani Embassy. When Power Man and Iron Fist free each of these men, the Monolith's powers weaken until he's reduced to his former self. With the Monolith powerless, Iron Fist destroys the Cheops Crystal, rending Ahmet back to his normal self.: Condition: 6.5 126 / 193 -
: Condition: 8.5 VF+ 127 / 193 -
: Condition: 8.5 VF+ 128 / 193 -
Prestige Format
'Red Scare'
Note: Statement on inside front cover reads 'Spawn vs Batman is a companion piece to DC Comics The Dark Knight Returns it does not represent current DC continuity.'
Includes a 2-pg. pin-up by Greg Capullo and a 1-pg. pin-up by Frank Miller and Todd McFarlane. : Condition: 8.0135 / 193 -
Prestige Format
'Red Scare'
Note: Statement on inside front cover reads 'Spawn vs Batman is a companion piece to DC Comics The Dark Knight Returns it does not represent current DC continuity.'
Includes a 2-pg. pin-up by Greg Capullo and a 1-pg. pin-up by Frank Miller and Todd McFarlane. : Condition: 8.0136 / 193 -
A New Hope, pt. 3 \n \n'Death Star!' – (18-page story) – Grand Moff Tarkin destroys the planet Alderaan with the Death Star I, while the captive Princess Leia Organa looks on in despair. Meanwhile, Obi-Wan Kenobi and Luke Skywalker with their droids R2-D2 and C-3PO are being transported to the planet Alderaan in the Millennium Falcon, piloted by Han Solo and Chewbacca. As they approach their destination they discover the remnants of the destroyed planet and are soon captured by the Death Star. While on the Death Star, they find that Princess Leia is being held there and they attempt to rescue her from her captors. : Condition: 8.5 144 / 193 -
A New Hope, pt. 3 \n \n'Death Star!' – (18-page story) – Grand Moff Tarkin destroys the planet Alderaan with the Death Star I, while the captive Princess Leia Organa looks on in despair. Meanwhile, Obi-Wan Kenobi and Luke Skywalker with their droids R2-D2 and C-3PO are being transported to the planet Alderaan in the Millennium Falcon, piloted by Han Solo and Chewbacca. As they approach their destination they discover the remnants of the destroyed planet and are soon captured by the Death Star. While on the Death Star, they find that Princess Leia is being held there and they attempt to rescue her from her captors. : Condition: 8.5 145 / 193 -
: Condition: 4.5 146 / 193 sold -
: Condition: 4.5 147 / 193 sold -
: Condition: 8.0 VF 148 / 193 sold -
: Condition: 8.0 VF 149 / 193 sold -
1st full appearance of Doomsday. \n \n————— \n \n'Doomsday! Part One' – (22-page story) – Doomsday escapes from the mountain he was inside and begins his rampage across America. Meanwhile, Superman deals with the Underworlders as Keith tries to find his mother again.: Condition: 9.2 152 / 193 sold -
1st full appearance of Doomsday. \n \n————— \n \n'Doomsday! Part One' – (22-page story) – Doomsday escapes from the mountain he was inside and begins his rampage across America. Meanwhile, Superman deals with the Underworlders as Keith tries to find his mother again.: Condition: 9.2 153 / 193 sold -
: Condition: 7.0 FN/VF 154 / 193 -
: Condition: 7.0 FN/VF 155 / 193 -
• 'To Die Like a God!' – (16-page story, continued from previous issue) – Thor's hammer has been separated from him by Rock Trolls, trapping both he and Sif in New York City. As the seconds before Thor transforms back into Donald Blake tick by, Sif refuses to accept defeat attempts to use her latent mystical talent to transported them back to Asgard. This succeeds, and the two find themselves transported back to the home of the Rock Trolls. There they stumble upon the fact that the Rock Trolls seek to make a replica of Thor's hammer so that they might better crush the Gods and take over Asgard.
While in the city proper, Odin and his forces continue to try and defend the city, however they are easily fought back by the Rock Trolls and their advanced weaponry, which they forced the Orikal to build for them. Believing that he has been abandoned by his son, Odin enters the fray with his Scepter of Power, however finds bested when the Rock Trolls arrives with a weapon that drains it of it's power, rending it useless. Unwilling to accept defeat, Odin tosses the useless weapon aside and orders his warriors back into battle.
While back in the underground cavern of the Rock Trolls, Thor and Sif find Ulik who has had the Rock Troll's best forgers create a duplicate hammer. Thor reveals himself to Ulik, and using the enchantment that pulls the hammer back into his possession to divest Ulik of one of the hammers in his hands. Although both have an equal weapon, Thor is able to gain the advantage in combat. Witnessing Ulik's failing performance in battle, Geirrodur grabs a Menti-Horn and calls the Orikal to come to their aid and destroy the Thunder God.
The Orikal, appears before Thor and Sif, and tells the Thunder God that he only fights for Geirrodur because the King of the Rock Trolls has him enslaved with mystical flames. Thor tells the Orikal that there is another way when Ulik once more attacks. Thor fights Ulik off who flees to the flames control switch and threatens to turn it to full power. Thor prevents this by a quick throw of his hammer which knocks Ulik out.
Thor then frees the Orikal, who thanks Thor for rescuing him and departs Asgard, taking the energy which powers the Rock Troll's weapons with him. As the tide of battle turns and the Rock Trolls are sent fleeing back to their domain, Geirrodur agrees to surrender, and complies with Thor's demand that the Rock Trolls return to their home. Thor then uses the Rock Troll's tunnel to return to the city of Asgard where he is reunited with his father and hailed as a hero once more by the people of Asgard.
• 'Tales of Asgard: The Secret of the Mystic Mountain!' – (5-page story, continued from previous issue) – Sending away his evening entertainment, Mogul learns from his adviser that Thor and the Warriors Three are seeking out the location of Mystic Mountain so that Hogun may get revenge against Mogul for killing his people. Mogul scoffs at this foolishness, confident that his Jinni Devil will be adequately powerful to stop them from achieving their goal.
Meanwhile, Thor and the Warriors Three arrive at the location where the Wazir told them that Mystic Mountain can be found, however all they find is a baron clearing. This upsets Hogun who believes that they have been tricked, however Thor does not believe so. Thor quickly strikes the ground with his hammer, cracking open the ground and revealing the location of Mystic Mountain's central city (Zanadu) is actually hidden beneath the ground.
Breaking the glass barrier around the city, Hogun leads the others towards the newly made opening, however before they can enter the city of Zanadu, they are confronted by the Jinni Devil who welcomes the heroes to their doom. ...(story continues in next issue).: Condition: 6.5156 / 193 -
• 'To Die Like a God!' – (16-page story, continued from previous issue) – Thor's hammer has been separated from him by Rock Trolls, trapping both he and Sif in New York City. As the seconds before Thor transforms back into Donald Blake tick by, Sif refuses to accept defeat attempts to use her latent mystical talent to transported them back to Asgard. This succeeds, and the two find themselves transported back to the home of the Rock Trolls. There they stumble upon the fact that the Rock Trolls seek to make a replica of Thor's hammer so that they might better crush the Gods and take over Asgard.
While in the city proper, Odin and his forces continue to try and defend the city, however they are easily fought back by the Rock Trolls and their advanced weaponry, which they forced the Orikal to build for them. Believing that he has been abandoned by his son, Odin enters the fray with his Scepter of Power, however finds bested when the Rock Trolls arrives with a weapon that drains it of it's power, rending it useless. Unwilling to accept defeat, Odin tosses the useless weapon aside and orders his warriors back into battle.
While back in the underground cavern of the Rock Trolls, Thor and Sif find Ulik who has had the Rock Troll's best forgers create a duplicate hammer. Thor reveals himself to Ulik, and using the enchantment that pulls the hammer back into his possession to divest Ulik of one of the hammers in his hands. Although both have an equal weapon, Thor is able to gain the advantage in combat. Witnessing Ulik's failing performance in battle, Geirrodur grabs a Menti-Horn and calls the Orikal to come to their aid and destroy the Thunder God.
The Orikal, appears before Thor and Sif, and tells the Thunder God that he only fights for Geirrodur because the King of the Rock Trolls has him enslaved with mystical flames. Thor tells the Orikal that there is another way when Ulik once more attacks. Thor fights Ulik off who flees to the flames control switch and threatens to turn it to full power. Thor prevents this by a quick throw of his hammer which knocks Ulik out.
Thor then frees the Orikal, who thanks Thor for rescuing him and departs Asgard, taking the energy which powers the Rock Troll's weapons with him. As the tide of battle turns and the Rock Trolls are sent fleeing back to their domain, Geirrodur agrees to surrender, and complies with Thor's demand that the Rock Trolls return to their home. Thor then uses the Rock Troll's tunnel to return to the city of Asgard where he is reunited with his father and hailed as a hero once more by the people of Asgard.
• 'Tales of Asgard: The Secret of the Mystic Mountain!' – (5-page story, continued from previous issue) – Sending away his evening entertainment, Mogul learns from his adviser that Thor and the Warriors Three are seeking out the location of Mystic Mountain so that Hogun may get revenge against Mogul for killing his people. Mogul scoffs at this foolishness, confident that his Jinni Devil will be adequately powerful to stop them from achieving their goal.
Meanwhile, Thor and the Warriors Three arrive at the location where the Wazir told them that Mystic Mountain can be found, however all they find is a baron clearing. This upsets Hogun who believes that they have been tricked, however Thor does not believe so. Thor quickly strikes the ground with his hammer, cracking open the ground and revealing the location of Mystic Mountain's central city (Zanadu) is actually hidden beneath the ground.
Breaking the glass barrier around the city, Hogun leads the others towards the newly made opening, however before they can enter the city of Zanadu, they are confronted by the Jinni Devil who welcomes the heroes to their doom. ...(story continues in next issue).: Condition: 6.5157 / 193 -
Chapter 1: Thunder in the 31st Century!' \n'Chapter 2: And They Shall Be Guardians of the Galaxy' \n'Chapter 3: The Master Plan of Korvac!' \n'Chapter 4: This Battleground Paradise!' \ncover: 'Thor Side-by-Side with the Guardians of the Galaxy! Versus Korvac and His Minions of Menace!' \nepilogue: 'Out into the night strides the God of Thunder -- and for a long time, he stares off into the star-studded firmament, his heart aglow with memories of comrades yet to come.' : Condition: 8.5 160 / 193 -
Chapter 1: Thunder in the 31st Century!' \n'Chapter 2: And They Shall Be Guardians of the Galaxy' \n'Chapter 3: The Master Plan of Korvac!' \n'Chapter 4: This Battleground Paradise!' \ncover: 'Thor Side-by-Side with the Guardians of the Galaxy! Versus Korvac and His Minions of Menace!' \nepilogue: 'Out into the night strides the God of Thunder -- and for a long time, he stares off into the star-studded firmament, his heart aglow with memories of comrades yet to come.' : Condition: 8.5 161 / 193 -
Deathknell: Condition: 6.0 FN 162 / 193 -
Deathknell: Condition: 6.0 FN 163 / 193 -
: Condition: 7.5 164 / 193 -
: Condition: 7.5 165 / 193 -
Green Foil cover
Story 1: 'My Enemy's Enemy ...,Pt. 4 of 4: Total War'
cover: 'Introducing the All-new, All-daring Spider-Armor!'
Story 2: 'The Origin of Nightwatch'
Nightwatch next in Web of SM Annual no. 9
First appearance of Spider-Armor
Origin of Nightwatch
Green foil cover
'My Enemy's Enemy,' (part 4 of 4)
'Total War' – (continued from last Issue) – Spider-Man is at a standstill with Dragon Man, Super-Adaptoid and Dreadnought when Vanisher, Eel and Blitz appear, trying to blast Spider-Man he dodges and deals with the androids. While riding Dragon Man Spider-Man places a spider tracer on him and tries to get back to the Foreigner's office.
We are then taken to Richard Fisk in his Rose Garden as talks about how hard he has fought to keep others from inheriting his father's empire. Cutting through waves on a speedboat, Alfredo Morelli, calling him self the Gauntlet (which he stole from Nightwatch) swears his vengeance on former friend Richard Fisk.
Meanwhile on a darkened street, a car jacker tries to get a lady's car. Nightwatch comes out of the shadows and takes care of the car jacker, then mentions that his animate clock can sense the energy surges of his stolen glove.
Peter Parker is inside the E.S.U. science lab trying to make up some of his lab work, when, being stressed he breaks a test tube and calls it a night. He then returns later that night when everyone has gone home and designs some new webbing and something that will help protect him against the New Enforcers.
Nightwatch visits the Dock Gauntlet destroyed, while Gauntlet breaks in to Richard Fisk's base and lastly, Blood Rose arrives at a mansion. Blood Rose is then stopped by Dragon Man, Super-Adaptoid and Dreadnought but sets off a interface signal jammer that causes the androids to fight among themselves. Continuing forward, Blood Rose is then stopped by the New Enforcers' Outer Circle and bound by Plant-Man's vines. Spider-Man swings in to the rescue wearing a new pseudo-metallic composite armored suit. But with each consecutive encounter with a member of the Outer Circle the armour grows weaker, until Spider-Man is one-on-one with Thermite. Spider-Man is caught by Thermite's cold blast, and as Spider-Man breaks free, the armour shatters. Also on the scene, Nightwatch battles Gauntlet. Blood Rose has Gauntlet in his sights but shoots Nightwatch instead. Knowing that Blood Rose would try and escape via the trees on the property, Spider-Man rigs spiderwebs to slow down Blood Rose. Nightwatch takes care of Gauntlet, as Spider-Man handles Blood Rose and unmasks him, only to find out he's Richard Fisk. The cops come and take care of Gauntlet and Richard Risk. They apologize to Mr. Graycrest for the trouble on his property, he dismisses the cops and returns to his mansion, where the New Enforcers are gathered.
'The Origin of Nightwatch' – E.S.U. is having a Graduation Ceremony, where Mrs. Ashley Croix is introducing the youngest department head at E.S.U., Doctor Kevin Trench. He gives a brief speech and after the ceremony they walk off together and talk about the future. Ashley tells Kevin that this time next week she'll be in Paris working for Morelli Pharmaceuticals then the two share a kiss. We are taken to a week later where they're at the airport saying their goodbyes. As Kevin is walking away a portal opens and he is assaulted by invisible fist, then another portal opens up and Nightwatch comes out from it and uses his vision to see the assailants. One escapes back into the portal. Nightwatch then dies and Kevin removes the Nightwatch mask and sees himself from the future, and in his hand a newspaper clip from a future event. Cops breeze past him and he questions what's going on. He put on the suit and finds out that Ashley's plane has been hijacked. Nightwatch tries to save the day, but fails when an altercation in the cargo room leads the hijackers to shoot the fuselage, making the plane explode in mid-air. With the loss of his love and not knowing how to handle the costume, he moves to a deserted island and lives there in peace until Alfredo Morelli, who would become Gauntlet, washes up on the shore, which made him return to New York and protect the city as Nightwatch.: Condition: 9.4 NM166 / 193 sold -
Green Foil cover
Story 1: 'My Enemy's Enemy ...,Pt. 4 of 4: Total War'
cover: 'Introducing the All-new, All-daring Spider-Armor!'
Story 2: 'The Origin of Nightwatch'
Nightwatch next in Web of SM Annual no. 9
First appearance of Spider-Armor
Origin of Nightwatch
Green foil cover
'My Enemy's Enemy,' (part 4 of 4)
'Total War' – (continued from last Issue) – Spider-Man is at a standstill with Dragon Man, Super-Adaptoid and Dreadnought when Vanisher, Eel and Blitz appear, trying to blast Spider-Man he dodges and deals with the androids. While riding Dragon Man Spider-Man places a spider tracer on him and tries to get back to the Foreigner's office.
We are then taken to Richard Fisk in his Rose Garden as talks about how hard he has fought to keep others from inheriting his father's empire. Cutting through waves on a speedboat, Alfredo Morelli, calling him self the Gauntlet (which he stole from Nightwatch) swears his vengeance on former friend Richard Fisk.
Meanwhile on a darkened street, a car jacker tries to get a lady's car. Nightwatch comes out of the shadows and takes care of the car jacker, then mentions that his animate clock can sense the energy surges of his stolen glove.
Peter Parker is inside the E.S.U. science lab trying to make up some of his lab work, when, being stressed he breaks a test tube and calls it a night. He then returns later that night when everyone has gone home and designs some new webbing and something that will help protect him against the New Enforcers.
Nightwatch visits the Dock Gauntlet destroyed, while Gauntlet breaks in to Richard Fisk's base and lastly, Blood Rose arrives at a mansion. Blood Rose is then stopped by Dragon Man, Super-Adaptoid and Dreadnought but sets off a interface signal jammer that causes the androids to fight among themselves. Continuing forward, Blood Rose is then stopped by the New Enforcers' Outer Circle and bound by Plant-Man's vines. Spider-Man swings in to the rescue wearing a new pseudo-metallic composite armored suit. But with each consecutive encounter with a member of the Outer Circle the armour grows weaker, until Spider-Man is one-on-one with Thermite. Spider-Man is caught by Thermite's cold blast, and as Spider-Man breaks free, the armour shatters. Also on the scene, Nightwatch battles Gauntlet. Blood Rose has Gauntlet in his sights but shoots Nightwatch instead. Knowing that Blood Rose would try and escape via the trees on the property, Spider-Man rigs spiderwebs to slow down Blood Rose. Nightwatch takes care of Gauntlet, as Spider-Man handles Blood Rose and unmasks him, only to find out he's Richard Fisk. The cops come and take care of Gauntlet and Richard Risk. They apologize to Mr. Graycrest for the trouble on his property, he dismisses the cops and returns to his mansion, where the New Enforcers are gathered.
'The Origin of Nightwatch' – E.S.U. is having a Graduation Ceremony, where Mrs. Ashley Croix is introducing the youngest department head at E.S.U., Doctor Kevin Trench. He gives a brief speech and after the ceremony they walk off together and talk about the future. Ashley tells Kevin that this time next week she'll be in Paris working for Morelli Pharmaceuticals then the two share a kiss. We are taken to a week later where they're at the airport saying their goodbyes. As Kevin is walking away a portal opens and he is assaulted by invisible fist, then another portal opens up and Nightwatch comes out from it and uses his vision to see the assailants. One escapes back into the portal. Nightwatch then dies and Kevin removes the Nightwatch mask and sees himself from the future, and in his hand a newspaper clip from a future event. Cops breeze past him and he questions what's going on. He put on the suit and finds out that Ashley's plane has been hijacked. Nightwatch tries to save the day, but fails when an altercation in the cargo room leads the hijackers to shoot the fuselage, making the plane explode in mid-air. With the loss of his love and not knowing how to handle the costume, he moves to a deserted island and lives there in peace until Alfredo Morelli, who would become Gauntlet, washes up on the shore, which made him return to New York and protect the city as Nightwatch.: Condition: 9.4 NM167 / 193 sold -
: Condition: 7.0 FN/VF 168 / 193 sold -
: Condition: 7.0 FN/VF 169 / 193 sold -
: Condition: 5.5 FN- 170 / 193 -
: Condition: 5.5 FN- 171 / 193 -
: Condition: 6.0 FN 174 / 193 -
: Condition: 6.0 FN 175 / 193 -
The Warlock Wears Three Faces!' – (15-page story) – The X-Men have been ordered to disband by the FBI. Having just left the group, Bobby and Hank have gone into New York City for a date with their girlfriends, Vera and Zelda; however their minds are heavy with thoughts about being members of the X-Men. Vera and Zelda have Hank and Bobby take them to see the Maha Yogi, a popular hypnotist act, unaware that the Maha Yogi is really their old foe the Warlock. When the quartet attempts to get tickets for the show they find out it is all sold out. Hoping for a cancellation, the group goes to Cafe A-Go-Go until show time. The Warlock is currently in a session with his audience and he uses his hypnotic power to make the audience his willing slaves who are to become part of a growing psychic army. ...
'I, the Iceman' – (5-page story) – Iceman explains to the reader how his mutant powers work and how he uses them to create ice constructs like his ice slide. He also shows off different things he can create with his powers such as a bombardment of ice chunks, an ice boomerang, ice shields etc.: Condition: 6.0 FN184 / 193 -
The Warlock Wears Three Faces!' – (15-page story) – The X-Men have been ordered to disband by the FBI. Having just left the group, Bobby and Hank have gone into New York City for a date with their girlfriends, Vera and Zelda; however their minds are heavy with thoughts about being members of the X-Men. Vera and Zelda have Hank and Bobby take them to see the Maha Yogi, a popular hypnotist act, unaware that the Maha Yogi is really their old foe the Warlock. When the quartet attempts to get tickets for the show they find out it is all sold out. Hoping for a cancellation, the group goes to Cafe A-Go-Go until show time. The Warlock is currently in a session with his audience and he uses his hypnotic power to make the audience his willing slaves who are to become part of a growing psychic army. ...
'I, the Iceman' – (5-page story) – Iceman explains to the reader how his mutant powers work and how he uses them to create ice constructs like his ice slide. He also shows off different things he can create with his powers such as a bombardment of ice chunks, an ice boomerang, ice shields etc.: Condition: 6.0 FN185 / 193 -
: Condition: 5.5 FN- 186 / 193 -
: Condition: 5.5 FN- 187 / 193
Photos 101 - 193 of 193
Per page: